How to build a template
In this article, you will learn what a template is and we’ll help you create one from scratch.
What is a template?
A template is a predesigned file that you use to create documents quickly with the desired layout and formatting for your final output (e.g. certificates, report cards, …) with supplied data (like Name, Age, Course, …) that are stored and fetched from your datasource. Publigo templates can be made using Google Docs, Slides, or Sheets.
To include relevant data from your datasource, simply add markers to your template using the prescribed form: {{marker name}} - for example, {{First Name}}. But with Publigo, you don’t need to manually enter markers anymore.
Steps in building a template
A. Prepare the overall layout and formatting
1. Create your template using Google Docs, Slides, or Sheets.
2. Enter the relevant elements (text and/or images).
There’s no need to manually enter your markers at this stage. We will do this with a simple and error-free point-and-click later on.
Here is our example:

B. Connect the datasource
We’re going to link your template to the datasource. This way, all the relevant data are fetched and displayed in your merged document.
To do this:
1. Open Publigo
2. Click Add markers.

3. Select your datasource.

C. Insert relevant markers
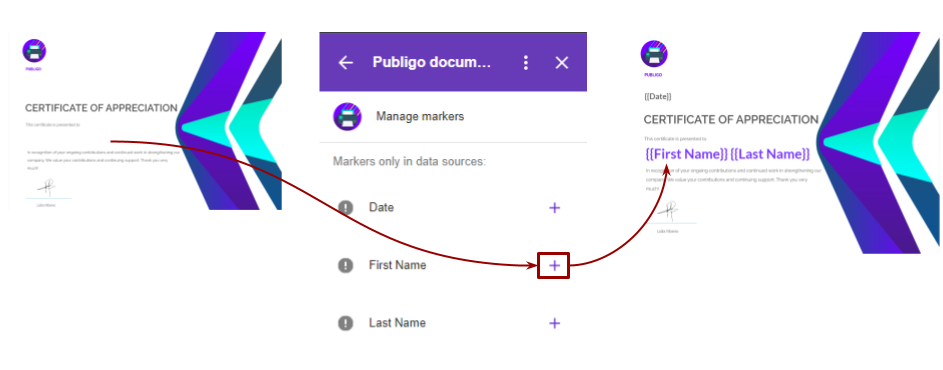
1. Click anywhere in your template where you want to place a particular marker.
2. In the Publigo UI (sidebar), click the plus sign(s) of the relevant marker(s).
In our example, we clicked the plus signs for First Name and Last Name (📌 with a space in between).
This point-and-click method eliminates mistakes caused by typographical errors.
3. Format the markers as needed (e.g., color, font, size, … ).